富士市にて土間コンクリートの仕上げ作業を行いました。
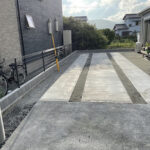
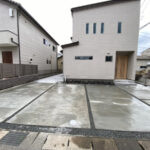
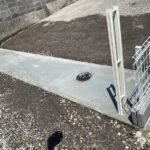
先日施した土間コンクリート打設の仕上げ作業です。 コンクート右側と間のスリット部分には施主様がDIYで芝張りをする予定との事なので、クッション性のある砂を敷いた状態で引き渡しをさせていただきました。 このようにD…
先日施した土間コンクリート打設の仕上げ作業です。 コンクート右側と間のスリット部分には施主様がDIYで芝張りをする予定との事なので、クッション性のある砂を敷いた状態で引き渡しをさせていただきました。 このようにD…

土間コンクリートの打設段取りとは、写真のように木材で枠を組んで生コンクリートの圧で流れてしまわないように、鉄の棒で押さえています。 コンクリート表面のクラック(ひび割れ)防止のため、ワイヤーメッシュを敷…
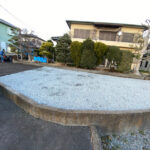
砂利敷きをするにあたって、まずは掘削作業から始めます。 今回のお宅のように広い面積の場合は重機を使用して掘削、整地をします。 掘削作業を終えたら防草シートを敷きます。砂利のままでは雑草が生えやすく雑草だらけになる…
コンクリートは強度や耐久性が重要で、適度な厚みが無いとヒビ割れを起こしたり劣化の恐れがあります。なので下地には砕石を厚み10cmになるように均等に均してから、コンクリートの打設を行います。 そして打設後には枠が膨…

今回はタイルで玄関アプローチの施工をしました。 この場所は来客時に駐車をする可能性を考慮し、下地に土間コンクリートを打設しました。 タイル施工では目地の間隔や高さが一定でないと仕上がりが悪くなってしまい…
こちらの住宅は既に外構工事が完工していました。 ですが追加で工事を行いたいというお客様からのご依頼をいただきました。 今回は物置とサイクルポートの設置工事です。 このような規模の工事だと、2点合わせても…
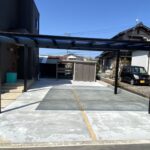
この住宅ではシンプルテイストな外構工事に仕上がりました。 家の正面には駐車場兼アプローチの土間コンクリートを打設しました。 家の左脇は来客者が駐車することを視野に入れ、砂利敷きを行いました。 砂利敷きは…
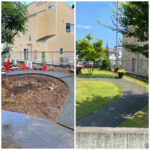
芝は繁殖力旺盛で、一部分を撤去しても自然と伸び広がってしまいます。 伸び広がるのを阻止するにはブロックで仕切るかすべて撤去するか、徹底的に行わなければなりません。 なので今回は芝をすべて撤去した後に防草…
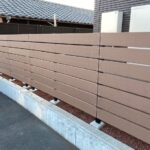
このフェンスは間隔が狭く目隠し効果が高いフェンスです。 エコモックフェンスは木紛に樹脂を混ぜ合わせて作られている為、天然木の風合いを演出しながらも、木特有のささくれや日焼けによる劣化がしにくい製品となってお…
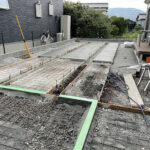
土間コンクリートの打設前に重要となるのが下地づくりです。 画像のように木材で枠を組み、生コンクリートの圧で動かないように鉄の棒で固定しています。 土間コンクリートの強度とひび割れ防止の為に、ワイヤーメッ…
ここの外構工事ではコスト削減のため敷地入口のみ土間コンクリートの打設を行い、その他の場所は砕石を敷き締め固めました。 入口付近を土間コンクリートにすることによって、砂利が道路などに出るのを防止する効果が…
今回はハウスメーカー施工で既存している玄関ポーチに、延長でアプローチを作りました。 1段目は【東洋工業/カルムペイプ】製品の600×300角のサイズを使用して、周りに錆砂利を敷きました。 2段目は【東洋…